Powering a Windows PC via HomeAssistant
Table of Contents
I have a PC hooked up to the TV in our living room, which is used primarily for Kodi and video games. I’m using a Logitech Harmony activity to switch the TV on, power the AV receiver, change to the PC input, etc. The only problem is that there’s no way to turn on or off the PC via Harmony, so I often sit down and forget to turn it on, or go to bed and find that it has been running all night. Inconvenient and a waste of energy!
Thankfully, we can use HomeAssistant to bridge the gap, but there are a few pieces to the puzzle.
Turning it on #
This is the really easy step, and will work for any properly configured PC on the network, not just Windows. HomeAssistant provides a Wake-on-LAN integration for just this purpose.
Configuring the Windows PC #
First, we need to enable Wake-on-LAN support on the Windows PC. This can differ from computer to computer — you may need to change a setting in both the BIOS and in Windows; in my case, I only needed to enable it in the BIOS. See this guide for instructions.
Creating a switch in HomeAssistant #
Now let’s create a simple power switch.
On Windows, pull up CMD and type ipconfig /all. You’ll see soomething like this:
Windows IP Configuration

...snip...

Ethernet adapter Ethernet:

   Connection-specific DNS Suffix  . : fritz.box
   Description . . . . . . . . . . . : Realtek PCIe GBE Family Controller
   Physical Address. . . . . . . . . : B4-2E-99-48-43-5B

...snip...
If you have multiple adapters, be sure to recognise the one you use to connect. The relevant information — the MAC address — is listed as the “Physical Address”. In my case, it’s B4-2E-99-48-43-5B. Copy this somewhere.
Now pop open your homeassisatnt configuration.yaml file and let’s make some changes:
wake_on_lan:
switch:
  - platform: wake_on_lan
    mac_address: 'B4:2E:99:48:43:5B'
    name: "PC Power"
Switch out your own MAC address.
The first line simply enables Wake-on-LAN support, whilst the switch definition is all we need to turn on the computer.
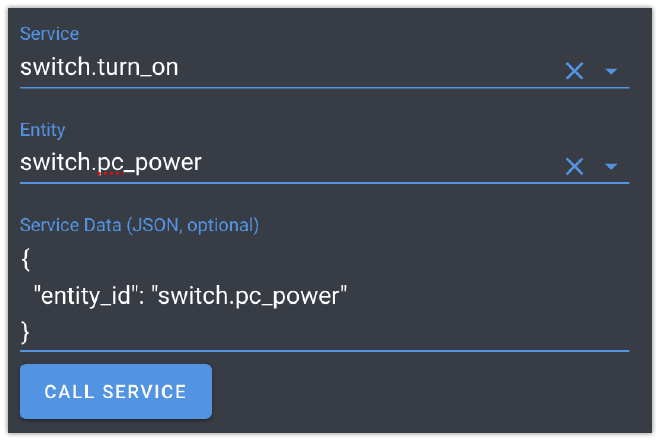
Now, with the PC turned off, head over to HomeAssistant, click the little “Services” button under “Developer tools”, and call your switch. Your computer should turn on!
Turning it off #
Now comes the potentially tricky part. We can’t turn off a computer using Wake-on-LAN, so we need to do this some other way.
If all you want to do is turn off the computer, you can use the handy RPC Shutdown integration.
Once you’ve installed and configured as per the instructions, you should just need to change your switch:
switch:
  - platform: wake_on_lan
    mac_address: 'B4:2E:99:48:43:5B'
    name: "PC Power"
    turn_off:
      service: hassio.addin_stdin
      data:
        addon: core_rpc_shutdown
        input: YOUR_COMPUTER_ALIAS
I haven’t tested this, however, as what I really want to do is hibernate the PC.
Hibernating it #
And this is where things get a bit more difficult. We can’t use RPC Shutdown to hibernate a PC, so our only option is to install some software on Windows that allows us to hibernate the machine remotely.
There are a number of options here, but I wanted to get by without installing any third-party software on the Windows machine if possible. A friend of mine suggested I use the built-in — albeit optional — Windows OpenSSH service, because you can hibernate via the command line locally. So I gave it a shot and found that it works great. Do note that this may not be available in all versions of Windows.
Installing the OpenSSH server #
Microsoft has a good guide on this. In a nutshell, open PowerShell as an administrator and paste the following:
# Install the OpenSSH Client
Add-WindowsCapability -Online -Name OpenSSH.Client~~~~0.0.1.0
Start-Service sshd
# OPTIONAL but recommended:
Set-Service -Name sshd -StartupType 'Automatic'
# Confirm the Firewall rule is configured. It should be created automatically by setup.
Get-NetFirewallRule -Name *ssh*
# There should be a firewall rule named "OpenSSH-Server-In-TCP", which should be enabled
# If the firewall does not exist, create one
New-NetFirewallRule -Name sshd -DisplayName 'OpenSSH Server (sshd)' -Enabled True -Direction Inbound -Protocol TCP -Action Allow -LocalPort 22
That’s it! Now try to SSH in using your Windows username and password from another machine:
ssh USERNAME@WINDOWS-IP
If that worked, let’s move on.
Creating a user and generating an SSH key #
Since we’ll be giving our HomeAssistant box full access to SSH into the Windows machine, I feel it’s wise only to give it access under a different Windows user, so go ahead and create a new local user in Windows. To save yourself a GUI nightmare, you can do this quickly in PowerShell:
$Password = Read-Host -AsSecureString
New-LocalUser "homeassistant" -Password $Password
Next, let’s generate an SSH key. Since I’m running HassOS which is docker-based, I need to ensure this remains persisted, so I’ve chosen to put the private key in the config directory. As such, I SSH into HassOS and generate it there:
ssh-keygen
Follow the prompts, saving your key where you want.
Finally, sign into Windows as your new user and create a new directory called .ssh under the home folder. Now paste in the public key you just generated and name the file authorized_keys.
Back in HomeAssistant, it’s time to check if we can access Windows over ssh:
ssh -i PRIVATE_KEY_LOCATION homeassistant@WINDOWS_IP
All working? Great, that’s the hard part!
Configuring HomeAssistant to hibernate the PC #
Now that we have SSH access, we can create a new shell command in HomeAssistant:
shell_command:
  turn_off_pc: 'ssh -o StrictHostKeyChecking=no -o ServerAliveInterval=1 -o ServerAliveCountMax=1 -i PRIVATE_KEY_LOCATION homeassistant@WINDOWS_IP "shutdown /h"'
All those flags will help avoid a variety of issues.
Now let’s modify the switch to call this command:
switch:
  - platform: wake_on_lan
    mac_address: 'B4:2E:99:48:43:5B'
    name: "PC Power"
    turn_off:
      service: shell_command.turn_off_pc
Done!
Logitech Harmony Integration #
We now have a switch to turn on and off the PC. Assuming you have a Logitech Harmony, though, you’ll want to combine it with your activities.
This will require a harmony activity sensor along with two automations: the sensor identifies what Harmony’s current activity is, and the automations act on that sensor.
The following assumes that your harmony hub is the entity remote.harmony_hub, the WoL switch is named pc_power, and the activity name is PC.
sensor:
  - platform: template
    sensors:
      - harmony_activity:
        value_template: >
          {% if is_state("remote.harmony_hub", 'on') %}
            {{ states.remote.harmony_hub.attributes.current_activity }}
          {% else %}
            PowerOff
          {% endif %}
sensor:
  - id: turn_on_pc_when_started_from_harmony
    alias: "PC started from Harmony Hub"
    trigger:
    - platform: state
      entity_id: remote.harmony_hub
    condition:
      condition: template
      value_template: '{{ trigger.to_state.attributes.current_activity == "PC" }}'
    action:
      service: switch.turn_on
      entity_id: switch.pc_power

  - id: turn_off_pc_when_stopped_from_harmony
    alias: "PC stopped from Harmony Hub"
    trigger:
    - platform: state
      entity_id: remote.harmony_hub
    condition:
      condition: template
      value_template: '{{ trigger.from_state.attributes.current_activity == "PC" }}'
    action:
      service: switch.turn_off
      entity_id: switch.pc_power
Now, when switching the PC activity, the PC will turn on or hibernate appropriately. One more step towards never having to get up from the sofa!